

You can find multiple open source tools for editing or converting your multimedia files into what you need. FFmpeg is also among those tools and the first choice for experienced users because of its high quality and quick results. A lot of media-related projects rely entirely on this fantastic tool for audio-video tasks.
With a single tool capable of doing so much, we will guide you on how can you use it to resize/scale your video files? So stay tuned.
Part 2: How to Resize/ Scale Your Videos in FFmpeg Easily?
During video editing, processing, and compression, one has to resize or scale the video many times to meet the final requirements. FFmpeg is a leading tool for changing media files to your required format, extracting audios, creating GIFs, scale, crop and edit the videos, and many more.
How To Resize/Scale Videos Using FFmpeg?
Following are the various tasks with all their steps to resize/scale your video file with FFmpeg.
In all the examples, we will be taking the input.jpg image with 535 ×346 pixels as a reference to see the final results.
Simple Rescaling
A scale filter is used in its most basic form for simply resizing the video to the desired size. The command to resize the video to 320:240 pixels will be:
ffmpeg -i input.avi -vf scale=320:240 output.avi
The command for the image will be:
ffmpeg -i input.jpg -vf scale=320:240 output_320x240.png
Keeping the Aspect Ratio:
For keeping the aspect ratio, you have to specify either width or height and set the other component to -1. When one component is set, the remaining component is calculated by the original image’s aspect ratio. For example, if the width is kept at 320, the height will be calculated as 206
For video:
ffmpeg -i input.mp4 -vf scale=320:-1 output.mp4
For image:
ffmpeg -i input.jpg -vf scale=320:-1 output_320.png
Using Variables
You can use variables instead of numbers to specify the width and height of the video file.
To scale a video width up to two times 2X, the command will be:
ffmpeg -i input.mp4 -vf scale=iw*2:ih output.mp4
For Image:
ffmpeg -i input.jpg -vf scale=iw*2:ih input_double_width.png
Avoid Upscaling
If you want to scale the video file without upscaling the dimensions, you will use the min expression. If width and height are set at 320 and 240, respectively, then the command line will be:
For Video:
ffmpeg -i input.mp4 -vf “scale=’min(320,iw)’:’min(240,ih)'” output.mp4
For Image:
ffmpeg -i input.jpg -vf “scale=’min(320,iw)’:’min(240,ih)'” input_not_upscaled.png
Pros and Cons of Using FFmpeg
Pros
- Comes with excellent codec and filter support
- Available as free/Open source
- Supports a lot of encoders and decoders
- Support major video and audio formats
Cons
- Not easy to use and implement by beginners
- Official document is unclear
- Limited cross-platform support
Part 3: Frequently Asked Questions
-
What Can FFmpeg Do?
FFmpeg is the leading multimedia framework that utilizes SDL and FFmpeg libraries and can decode, encode, transcode, mux, demux, stream, filter, and play almost every file. It even supports the oldest formats.
It uses command lines to perform complex or straightforward tasks related to multimedia file management, analysis, and alteration. It can convert audio and video formats and capture and encode in real-time from various hardware or software sources.
-
What Does FFmpeg Mean?
FFmpeg stands for Fast Forward Motion Picture Experts Group. The FFmpeg framework’s name is inspired by the MPEG video standards group with which FF (Fast Forward) is added. The zigzag green logo shows how MPEG video codecs in FFmpeg handle entropy encoding.
-
What Is the Command for Converting .Avi to .Flv In FFmpeg?
The command for converting .avi to .flv format in Ffmpeg is
ffmpeg -i input.avi -y -ab 56 -ar 44100 -b 200k -r 15 -f flv output.flv
-
How to Encode a Video Sequence for the iPod/iPhone?
To produce an mp4 file that plays fine on iPod and iPhone, use the following command line
ffmpeg -i input.mov -c:v libx264 -pix_fmt yuv420p -profile:v main -crf 1 -preset medium -c:a aac -movflags +faststart output.mp4
The useful optional tags that you can add for modifying quality and file size are
For quality:
-preset: ultrafast, superfast, veryfast, faster, fast, medium, slow, slower, veryslow, placebo
For file size:
-crf: 0-51
How to convert .Avi To Animated Gif (Uncompressed)?
To convert the .Avi to Animated Gif in uncompressed form, use the following command line:
ffmpeg -i original_video.avi animated_gif.gif
Anyone whose work involves video and audio editing is aware of the unending benefits of FFmpeg. It is the perfect solution to encode or decode any multimedia file.
Despite the unlimited use of FFmpeg, it is pretty tricky to use as a beginner. Most of the time, beginners cannot understand its documentation and get stuck while working with it. If you have been through the same issue, don’t worry because there are various other good video resizers/scalers that you can use to make things easy for you.
Part 4: Resize Video with Best FFmpeg Alternative (Windows &Mac)
iMyFone Filme – The Easiest Free Video Editing Software with Handy Scale Slider:
iMyFone Filme is the best option to choose if you are unable to work with FFmpeg. With its inbuilt features, it offers the easiest and straightforward experience of resizing and rescaling the videos. Not only the resizing, but Filme has also got a lot more to offer from basic to advanced level video editing options.
Features of Filme:
Filme has proved to be beginner-friendly video editing software just because of its remarkable features, which are:
- Easy video splitting, cropping, rotating without understanding technical knowledge
- Easy resizing, scaling without command lines
- Simplest steps to follow
- Make slideshows from hundreds of available templates
- Utilize various effects for making attractive videos
How to Resize/Scale Videos Using iMyFone Filme?
Follow the given steps to resize your video:
Step 1:
After launching Filme on your computer, select New Project from the File menu. A list will appear. Now, choose the required aspect ratio.
Step 2:
Import the input video from Import Files. Find the video and add it to Project, which will then appear in My Media.
Step 3:
Drag input video to Timeline. Double-clicking the video will show you the editing options on the right side of the window.
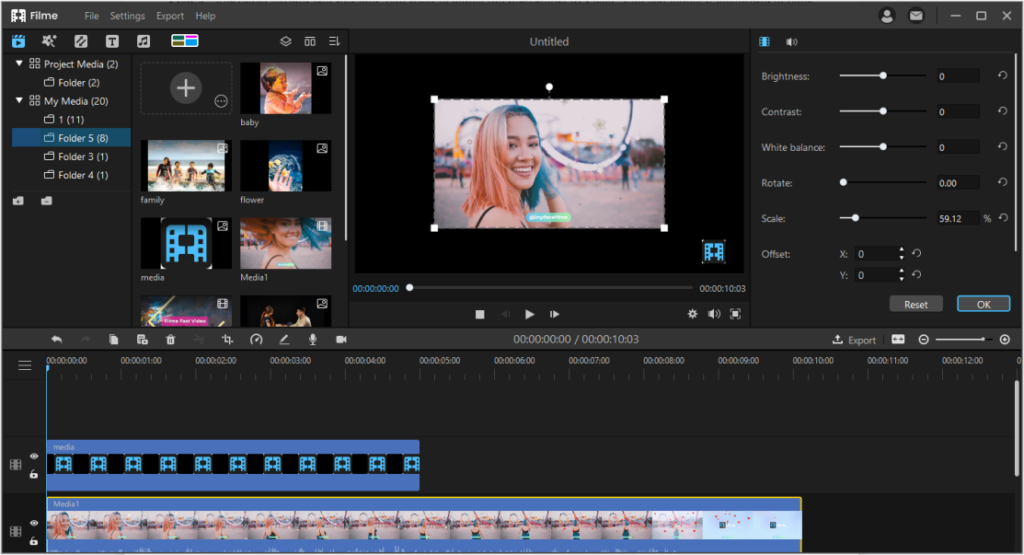

Step 4:
Adjust scale percentage. For making the smaller video, add the percentage of scale and keep it less than 100%.
Alternative step:
When the video is on Timeline, its borders are viewable. You can adjust the size by dragging the corners.
Step 5:
Now, position the video to where you want. Also, you can add values in x and y coordinates.
Step 6:
Now, click the Export Video from the Export Menu. Add video’s name and destination place and export.