
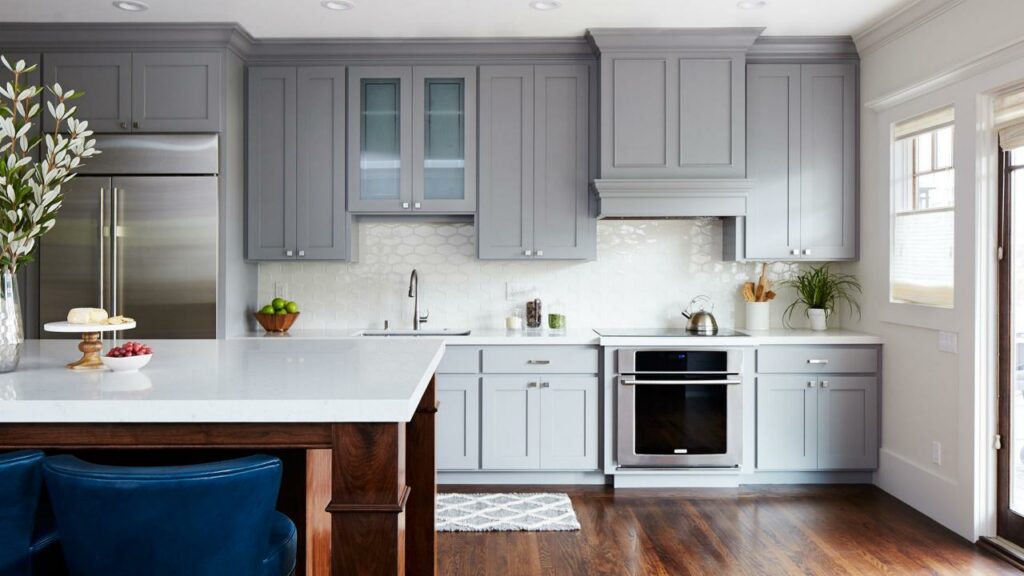
This post will explain paint your kitchen cabinets. Select the best paint and primer to provide your kitchen cabinets a high-quality finish without breaking your budget plan. If you’ve discovered the cost of brand-new appliances, countertops, and cabinets, it’s no surprise that refurbishing a cooking area is one of the most costly remodeling tasks. While few property owners discover methods to improve the appearance of an outdated refrigerator or worn-out granite, changing a cooking area by freshening the cabinets that make up most of the room’s visual area is totally within reach. But there’s more to the job than purchasing a gallon of your preferred color.
How To Paint Kitchen Cabinets
In this article, you can know about paint your kitchen cabinets here are the details below;
How Many Does it Cost to Paint Kitchen Cabinets?
Remodeling a cooking area is one of the most expensive renovation projects that you can handle, and following the cabinets can account for nearly 40 percents of that cost.
Cabinets for a 10-by 12-foot cooking area can easily top $5,000– and your new cabinets may be of lowers quality than the ones you’re changing. On the other hand, a couple of fresh coats of paint can go a long way towards transforming your existing cabinets for a portion of that cost. The painting cost must disappear than about $200, plus a weekend or 2 of your time.
Should I Paint My Cabinets?
Before you go out to the paint store, however, analyze your cabinets to see if they can be renewed in the first place. Even the first-rate paint task can’t restore low-cost cabinets that have grown frails with age. Thin veneers peel or delaminate, particleboard cabinets bottoms or shelves sag or breaks, and hanging rails come loose. If these are the concerns you’re dealing with, you’d be much better off replacing your kitchen cabinets.
Assuming that whatever is still in great shape and in good working order, let’s analyze a few of the concerns you’ll need to attend to before you start repainting your kitchen cabinets.
What Type of Paint Do I Needs for Cabinets?
Oil or latex?
Latex paints have been improving progressively, leading some pros to give up oil-based paints completely. Because they dry quickly and tidy up with water, latex paints are easier to use than oil-based paints. However, many pros still prefer oil-based topcoats, arguing that they form a harder, more durable paint movie and level out to a smoother end-up surface. Latex paints likewise take longer (up to 3 weeks) than oil-based paints to cure. In the meantime, they’re vulnerable to damage.
Bottom line: Either oil or latex will supply a good surface. If you utilize latex paint, make sure it’s a 100 percent acrylic solution, which provides higher durability and adhesion than vinyl acrylic paints.
Brush or Spray Paint?
A sprayed-on surface is the smoothest choice, but there’s a discovering curve for doing it effectively. You’ll likewise likely require to lease the spray devices, which drives up your costs. You’ll need to mask off all the areas in the kitchen that could unintentionally get sprayed, consisting of countertops, cabinet interiors, and home appliances which is a lengthy process.
For these factors, we advise you to select utilizing premium brushes rather. Invest in a great, 3- to 4-inch-wide square brush, whose straight ends will finish large, flat panels, along with an angled brush in the 2 1/2- or 3-inch-wide range, which will assist you get paint into the corners of doors with molding and can coat doors frames in one pass. Latex paint should be used with a synthetic bristle brush, which does not soak up water; oil-based paint should be used with a natural-bristle brush.
Can you just paint overs cabinets, or should you strip them?
When the existing finish is an clear coat, the best course of action is to remove the bare wood’s finish before painting. This gets rid of a possible adhesion problem in between the old finish and the new paint.
However, while removing may be suitable for perfectionists, it’s not always useful or required. A comprehensive cleansing followed by light sanding should be enough to prepare the surface for new paint.
Regular or faux finish?
If you’re open to revitalizing your kitchen’s appearance, including a faux surface can transform its style into worn-out trendy, rustic, provincial, or contemporary. Crackling glaze, which is readily available at paint stores, can, with extremely little effort, offer your cabinets a weathered look. Simply use the glaze over a dry base coat, brushing in only one direction (thick for large fractures, thin for great cracks), and let it dry. Finish with a flat overcoat of the base color brushed perpendicular to the glaze. The paint will begin to form fractures as it dries, a process that takes about an hour.
Another rustic styles is the distressed look, which does not require unique paint. This finish is comprised of layered colors and spattered dark paint. When the paint is dry, to reveals the colors beneath, distress the surface by hitting it with a chain and gently sanding in the spots where the cabinets get the most utilized.
Likewise, the antiqued, gradually aged appearance can be accomplished with some paint magic. Just dip the idea of a paintbrush in color lighter than the cabinets and dab the excess onto a fabric up until the brush is almost dry, then lightly graze the surface area of the information trim, corners, and seams.
On the other end of the spectrums is a high-gloss finish, which will change your kitchen into a refined, contemporary space. To shine up your cabinets, paint a high gloss clears acrylic varnish over your last coat. This method will add depth to the color and cover your cooking area’s surface with a glossy shine.
Paint Brushes and Materials You’ll Need.
– Paint – Look for a paint developed for trim, frequently identified enamel. The higher the sheen, the more long-lasting the surface– high gloss will stand better than satin.
– Roller – Do a 4- or 6-inch foam wave to cover the tops of cabinets and their presentation frames.
– Square Brush – The right end of a 3 to 4-inch-wide brush finishes big, flat panels.
– Angled Brush – An artificial angled brush in the 2 1/2- or 3-inch-wide range assists you get paint into corners of door’s with molding and can coat door frames in one pass.
– HVLP Sprayer – Not into the hand brushed look? Spraying on a topcoat is the most convenient way to get a smooth, factory-like surface. High volume/low-pressure sprayers are flexible sufficient to spray cabinets, fence panels, or exterior trim.
What To Do Before You Start.
Consider The Cost and Get an New Kitchen on a Budget.
Brown Bird Design.
Cabinets can account for almost 40 percent of a kitchen’s cost. Here’s how three typical cabinet upgrades accumulate in an average 10-by-10-foot cooking area.
Repainting would cost less than $200. Including new drawers and doors runs about $1,300, while updating to ready-to-assemble cabinets begins at about $1,630.
Set up a Temporary Kitchen.
Painting your cabinets implies taking an essential space off-line.
Plan ahead: Set-up a kitchen in a close-by space with a warmer, a toaster oven, and a cooler to work as a fridge throughout the task. Oh, and use paper plates.
Steps for Painting Cabinets.
1. Preparation of the space.
An effective paint job depends on diligent prep work, and the very first couple of steps are concentrated on prepping the room and cabinets for painting.
– Start by emptying the cabinets, clearing off counters, and getting rid of any freestanding devices.
– Relocate tables and other furnishings to another space.
– Tape rosin paper over the countertops and floor covering, and, to protect the rest of the houses from dust and fumes, tape plastic sheeting over the backsplash, windows, repaired devices, and interior doorways.
– Mask off the wall around the cabinets.
– Set up a worktable for painting doors, drawer’s, and shelves.
Brown Bird Design.
This makeshift jig provide’s access to all sides of an cabinet door to lower downtime throughout drying. Here’s how to set it up.
– Span a set of 2x4s at eye level between two ladders.
– Screw eye tools into one end of a 2×4, where access will be painted, and at the other end, screws hooks into both 2x4s to hang painted doors from.
– Add corresponding hooks to the best corners of upper cabinet doors and the bottoms of lowers doors and drawers, where the holes left won’t show up.
2. Get rid of the doors, drawers, and racks.
– Back out the hinge screws from the cabinets frame and remove the doors.
– Working from delegated right, top to bottom, label each one with a numbered piece of tape. Also, numbers the edges of cabinet shelves and the bottoms of drawers.
– Set aside the shelf-hanging hardware.
– At your worktable, get rid of the pulls and hinges and conserve what’s being recycled.
– On the doors, move the number from the tape to the exposed wood under one hinge.
– Cover it with fresh tape.
3. Clean all the surfaces.
– Use ordinary household cleaners to remove the gunk from the face frames, doors, drawer fronts, and shelving. If regular cleaners aren’t efficient, think about using a stronger cleaner like trisodium phosphate (TSP), which is sold at hardware and paint stores. Simply make sure you follow the safety precautions on the container.
– Once all the cabinet pieces are clean, wash them thoroughly with water and let them dry.
4. Preparation of the boxes.
– Open the windows for ventilation and place them on security equipment. Using an abrasive pad dipped in an liquid deglosser, scrub down all of the surfaces.
– Hold a rag below to capture drips. Prior to the deglosser vaporizes, rapidly wipe away the residue with another clean, deglosser-dampened rag.
– If you’re relocating the hardware, filles the old screw holes with a two-part polyester woods or autobody filler.
– It embeds in about 5 minutes, so blend only little batches. The filler diminishes a bit, so overfill the holes a little.
– As quickly as it sets, get rid of the excess with a sharp paint scraper. If it solidifies completely, sands it smooth.
– Sand all the surface areas with the grain using 100-grit paper.
– Vacuum the cabinets inside and out to ensure no little bits of dust mar the finish, then rub them down with an tack cloth for additional measure.
5. Prime the cabinet boxes.
Now it’s time for the primer. If the cabinets are greatly stained, use a stain-blocking guide, which dries quickly and seals knots and other surface area defects that may bleed through the overcoats. In the majority of situations, however, stain-blockers should not be required, and an oil-based or 100 percent acrylic latex guide will work simply great.
– Starting at the top of the cabinets, brush on the primer across the grain, then “tip-off”– pass the brush lightly over the wet finish in the direction of the grain. Constantly tip-off in a single stroke from one end to the other.
– Make sure to follow the hidden structure of the cabinet or door with the brush. Where as a rail butts into a stile, for instance, paint the rail first, overlapping slightly onto the stiles, then paint the stile before the overlap dries.
6. Sand, caulk and fill.
– After the primer is drys, sand the flat surface areas with 220-grit paper.
– Sand any profiled surface areas with a medium-grit sanding sponge. The wood ought to wind up sensation glass-smooth.
– Squeeze a thin beads of latex caulk into any open joints. (The hole in a caulk tube’s pointer should be no larger than the pointer of a sharp pencil.).
– Pull the suggestion as you go, then smooth the caulk with a moist finger. Fill any of the small dents, scratches, or dings with vinyl spackle, smoothed flat with a putty knife.
– Once the spackle is dry (about 60-minutes), sands again with 220-grit paper, vacuum, and wipes with a tack cloth.
– With a spray can of the fast-drying oil-based guide, spot-prime the spackle and any spots where the sandpaper has “burned through” the primer.
– Wait an hour, then sand the guide lightly with 280-grit paper.
– Vacuum all the surfaces, and clean them with a tack cloth.
7. Paint the cabinet boxes.
You’re lastly ready to paint! If you’re utilizing roughly the same shade as the existing color, two coats ought to get the job done. You might even get away with one. Painting over an dark finish with a light color is tougher and could require three coats. Break out a brand-new brush for each coat.
– Working from top to bottom, use the paint to the cabinet exterior across the grain, then tip it off with the grain.
– For the cabinet interiors, apply the paint with a smooth-surface mini roller, which leaves a slightly rough, orange-peel texture.
– Between coats, sand the surfaces gently, ensuring to tidy up the debris later on.
8. Prep, prime, and paint the door’s, drawers, and shelves.
The method for prepping, priming, and painting doors, drawers, and racks is the same when it comes to the cabinets; other than that all the work is done on a table to decrease the opportunity of drips, runs, and droops.
– When painting paneled doors, begin with the location around the panel.
– Then, do the main field of the panels, and finish with the stiles and rails around the edges.
– As you go along, clean up any paint that ends up on nearby dry surface areas to get rid of the possibility of lap marks.
Pointer: To speed up the drying time for doors, you can twist two screw hooks into holes drilled in an unnoticeable door edge (the lower edge for bottom cabinets, the upper edge for leading cabinets). Paint the doors outside face and let it dry for an hour while resting flat, then tilt the door-up onto its hooks and put a drywall screw into an existing hardware hole. Hold the slanted door up by the screw and paint the door’s backside.
– When you’re done painting, pick-up the door by the screw and one hook and hang both hooks on a sturdy clothes wall mount.
– Suspend the door from a showers curtain rod or clothing rod up until it dries.
9. Return all the pieces.
Picture by Kolin Smith.
– After the last coat is dry, replace the racks.
– Remove the tape over each door’s number, set up the hinges and knob, and hang them in their original opening.
– Replace the drawer pulls (or include brand-new ones) and re-install each drawer.