
In this article we completely guide you how to stop superfetch cmd. Furthermore, Superfetch is a finctionality in home windows 10 presented for two objectives. The first one is decreasing boot time as well as the second one is packing applications quicker. Moreover, superfetch does this by preloading them in the memory. It additionally tracks your use pattern for a better preloading decision. For instance, if you open chrome in the early morning.
It will certainly preload chrome in the morning hrs, to ensure that application load faster. But often prefetch comes to be a major source of high disk usage. So, in this article, we will certainly discuss just how to disable superfetch in home windows 10.
How To Stop Superfetch cmd in Windows 10
In this article, we discuss about how to stop superfetch cmd in windows 10 here are the details below;
Disable Superfetch/ SysMain through Solution manager
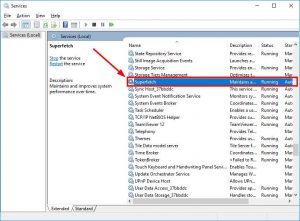

- Browse Services in the Taskbar Search
- Currently, Select Services.


- Locate Sysmain.
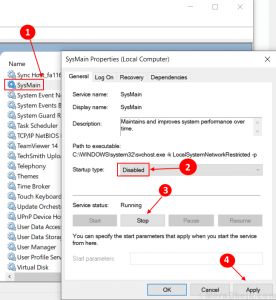
- Double click on Sysmain.
- Now, Choose Startup Type as Disabled from the dropdown.
- Click on Stop to stop the service.
- Choose Apply.

Disable superfetch / Sysmain through command prompt
Step 1 – Open command prompt as admin.
Step 2 – Write the command code given below and hit enter.
Disable superfetch through windows registry
1: Press Windows key + R together to bring up run command box.
2: Write Regedit in the run command box and hit enter.
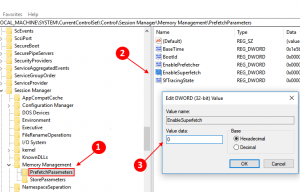
3: Now browse to the location given below.
- HKEY_LOCAL_MACHINE
- SYSTEM
- CurrentControlSet
- Control
- Session Manager
- MemoryManagement
- PrefetchParameters
Step 4: On the right side of the popped up box, find EnableSuperfetch entry from the list.
Moreover, put one of the following values in EnableSuperfetch depending upon your requirement.
- to disable Superfetch completely
- enable prefetching when program is launched
- to enable boot prefetching
- enable prefetching of everything

However, in this whole method we completely describe you how to stop Superfetch cmd in Windows 10. You should follow these steps in order to disable Superfetch/SysMain cmd in Windows 10.