
Screen recording with audio on a Mac is an invaluable means for various purposes, from creating tutorials to capturing gameplay moments. Whether you’re a content creator, educator, or just want to keep a record of something happening on your screen, knowing how to screen record on a Mac with audio is essential. In this guide, we’ll explore different methods to achieve this, both with third-party tools and Mac built-in features.
Screen Record on Mac with Audio Using Third-party Tools
Use Apeaksoft Screen Recorder for Mac
Third-party tools offer a range of features that can enhance your recording experience if you want to record your Mac screen with audio. One popular option is the Apeaksoft Screen Recorder for Mac. This versatile tool provides a user-friendly interface and excellent audio capturing capabilities.
Apeaksoft Screen Recorder is a powerful software designed for screen capturing and audio recording on Mac. It allows you to capture both your screen activities and system audio simultaneously, ensuring high-quality recordings. In addition to this feature, this Mac screen recorder is also a helper for you if you want to record your camera on Mac. And it is very convenient when you want to record Zoom meeting.
Steps to Use Apeaksoft Screen Recorder for Mac:
Step 1. Start by downloading and installing Apeaksoft Screen Recorder on your Mac.
Step 2. Open the software and click Video Recorder to select the recording area.
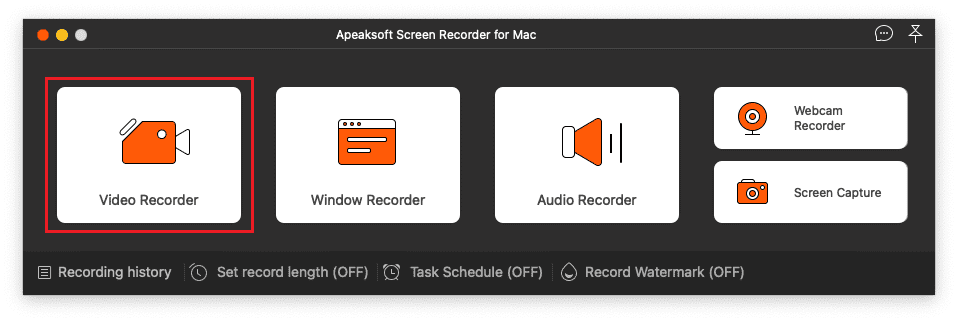

In this window, you can record the full screen, a window, or a customized area.
As you want to record your Mac screen with audio, you can turn on System sound to capture internal sounds and choose to record your microphone by enabling the Microphone option.
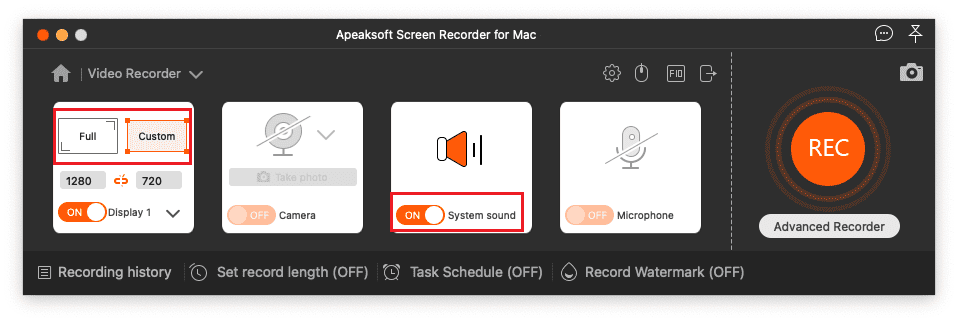
Step 3. Click the REC button to begin recording. Perform your desired actions on the screen while the software captures both video and audio.
Step 4. Click the Stop button to finish recording screen with audio on your Mac. The software will save the video with synchronized audio.
Pros and Cons of Apeaksoft Screen Recorder:
Pros:
- Easy-to-use interface.
- Simultaneous screen and audio recording.
- Customizable recording area.
- Option to record microphone input.
- High-quality output formats.
- Offer snipping tool for Mac.
Cons:
- Some more advanced functions may need a paid version.
Using OBS for Screen Recording with Audio
OBS is a popular open-source tool used by gamers, streamers, and content creators for screen recording and live streaming. While it’s primarily known for streaming, it’s also an excellent option for screen recording with audio on Mac.
Steps to Use OBS for Screen Recording with Audio:
Step 1. Download OBS Studio from its official website and install it on your Mac.
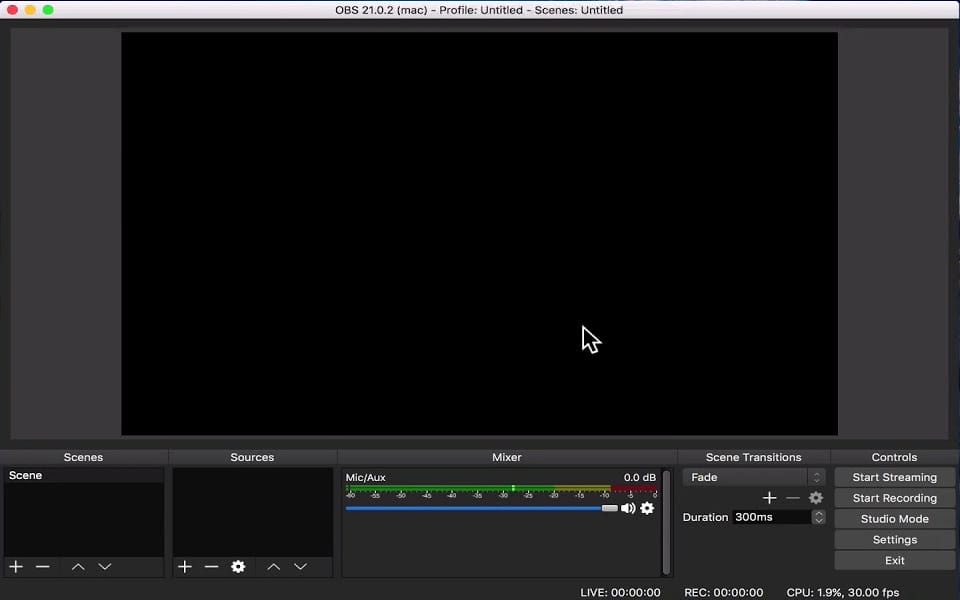
Step 2. Open OBS and click plus in the Scenes section to create a new one.
Step 3. Click plus in the Sources and select Display Capture. Then select the display you want to record.
Step 4. Next, click the plus button again and choose to Audio Input Capture for selecting your system audio as the source.
To capture internal audio, you’ll need additional software like BlackHole to route audio. Configure the audio settings accordingly.
Step 5. Click Start Recording to begin capturing your screen and audio. Once you’re done, click Stop Recording to save the video file.

Pros and Cons of Using OBS:
Pros:
- Free and open-source.
- Highly customizable.
- Offers advanced features for experienced users.
- Compatible with external audio routing tools.
Cons:
- Steeper learning curve.
- May require additional software for internal audio capture.
- Interface might be overwhelming for beginners.
Screen Recording with Audio on Mac Using Screenshot Toolbar
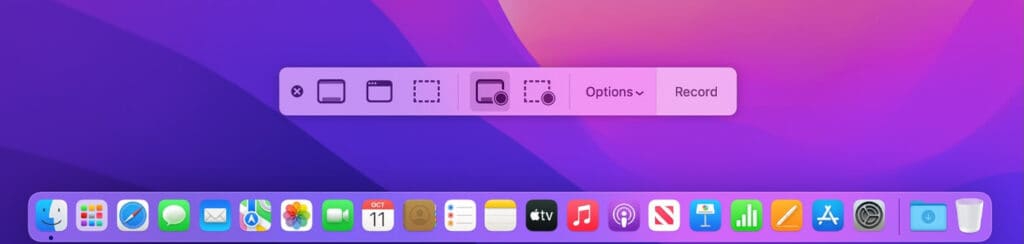
Step 1. Press Shift + Command + 5 to open the Screenshot Toolbar.
Step 2. Select the Record Entire Screen or Record Selected Portion option.
Step 3. Click the options button (three dots) and check the Microphone option to capture audio.
Step 4. Click the Record button to start recording. If you are going to finish recording, click Stop. Then the video file will be saved on your desktop.

Pros and Cons of Using Screenshot Toolbar:
Pros:
- Built-in feature, no additional software required.
- Simple and straightforward.
- Quick access using keyboard shortcuts.
Cons:
- Limited customization options.
- May not offer advanced recording settings.
Using QuickTime Player for Screen Recording with Audio
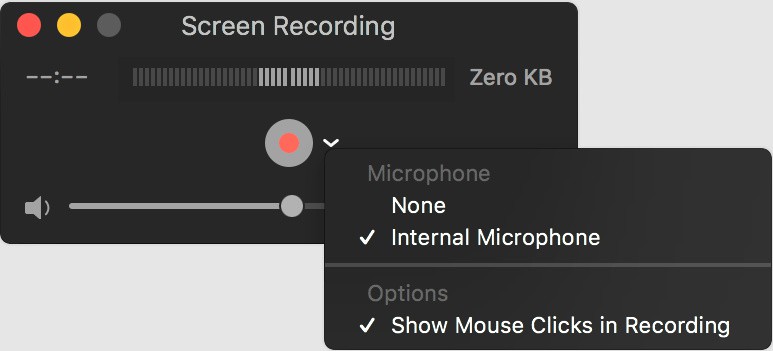
Step 1. Launch QuickTime Player from the Applications folder.
Step 2. Go to File > New Movie Recording.
Step 3. Click the down arrow button next to the Record button and choose your system audio and microphone.
Step 4. Start capturing your screen and audio by clicking Record. When complete your recording, click the Stop button.

Pros and Cons of Using QuickTime Player:
Pros:
- Easily accessible on Mac.
- No need to download additional software.
- Offers basic recording features.
Cons:
- Limited customization.
- May not support advanced recording settings.
Conclusion
Screen recording with audio on a Mac offers a world of possibilities for various tasks. Whether you opt for third-party tools like Apeaksoft Screen Recorder or open-source options like OBS, or even utilize built-in features like the Screenshot Toolbar or QuickTime Player, you have several methods to choose from.