
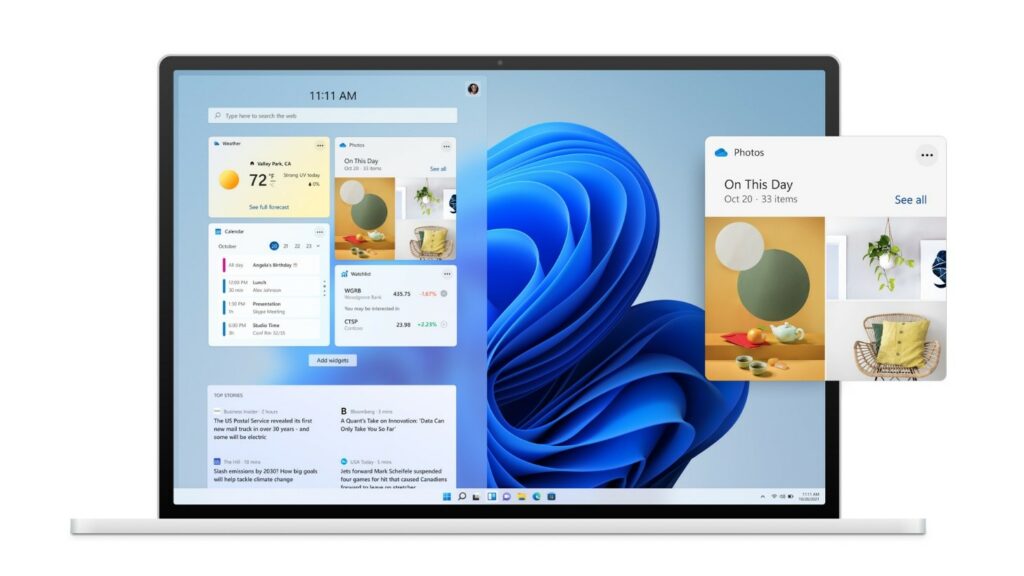
Microsoft announced Windows 11 on 24th June 2021. It is expected to release in late 2021. As you already know It is the successor of Windows 10. Microsoft has added a lot of exciting new features in the latest release of its Windows operating system. These features are all new centered Start menu, Fluent Design with new app icons. Microsoft Teams is now built-in in the OS. The addition of tools like Snap layouts, Desktops, Redocking will enhance the user experience. There is an all-new Microsoft Store with support for Android Apps through Amazon App Store. The Windows 11 update will be available as a free upgrade to the Windows 10 PCs as far as they fulfill the requirements.
How to Get Windows 11 Update on Windows 10
Windows 11 public build will be available later this year most probably in October. If you are a Windows lover and very excited to try out the features of Windows 11 on your PC right now then you will have to install one of the Insider Preview builds. To get the Windows 11 Insider Preview build first you will have to sign up for Windows Insider Program and then update your PC. I have provided the exact step-by-step process below, go through it to register for the Windows Insider Program, and get the Windows 11 update.
Note: Windows Insider Programs are filled with unknown bugs and issues. It is not recommended to install it on your main PC. Install it on the secondary device that you don’t use frequently. Also, It is always best to take a complete backup before starting the update process. It helps in recovering data in case something goes wrong after the update.
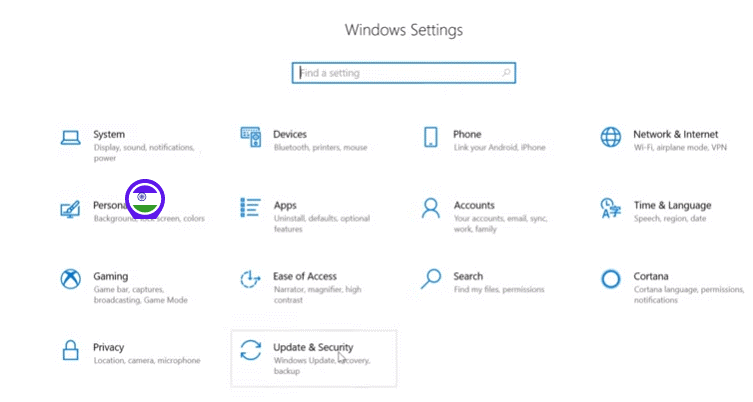
Step 1: Open Settings on your Windows 10 PC and go to Update and Security settings. Under the Update and security settings, you will find Windows Insider Program. Now tap on the Register and Sign up option. Once the sign-up is completed tap on Start flighting option. In case you are already a proud member of Windows Insider then use your login credentials to sign in.

Step 2: You will be asked to review the privacy statement and terms on the next screen. Go through all the information and tap on the Submit option.
Step 3: In the Insider settings you will see Dev Channel, select it. Install the latest available Windows 11 Build and tap on the Confirm option.
Step 4: After giving the confirmation your PC will send Microsoft Insider Privacy and Agreement. Read it and tap on Confirm.
Step 5: On the next screen tap on Restart Now to restart your PC and get the selected Windows 11 Insider Preview build.
Step 6: When Restarting gets completed make sure you are connected to a reliable Internet connection. Now go to Settings once again and then Update and Security. Under Update and security select Windows Update.
Step 7: Under Windows Update tap on Check for updates option. Now your Windows PC will connect with Microsoft servers to download the selected Windows 11 build.
After downloading Windows 11 complete the setup process. You might need to be connected to the Internet in completing the setup. After the completion of setup, you can start using Windows 11 Insider Build on your PC.
How to Recover Lost Data After Windows 11 Update
Updating to an unstable build of Windows means the risk of losing data as the Insider Builds are mainly for beta testing. The Insider builds are filled with several bugs leading to data loss. If you have lost data after Windows 11 update then no worries, below I have provided two methods to recover your data. It is as easy as recovering lost data from a backup or using professional data recovery software.
Method 1. Restore Lost Data from Backup
There is no better way than a backup to restore lost data after Windows 11 update. I recommend everyone to take a complete backup of their PC before updating Windows 11. It helps in recovering data if anything goes wrong after the completion of the update. So, If you have taken a backup of your PC then be rest assured you will get all your files back. Below is a step-by-step process to restore lost data from backup.
Step 1: Tap on the all-new Start menu from the center of your Windows 11 running PC.
Step 2: From Start Menu go to Settings and then go to Update and security settings.
Step 3: Under Update and security settings look for the Backup and restore option.
Step 4: At the final stage select the Restore my files option. Also, follow the instructions shown on the screen to restore the lost data.
So, this is how you can restore lost after Windows 11 update from backup. It is an easy process to just get to settings and then Update and security settings. From there use the backup and restore option to restore the lost data.
Use Windows 11 Data Recovery Software to Recover Data
What If you had no backup of your PC and you lost some of or all of your data after Windows 11 update. In that case, you will need powerful Windows 11 data recovery software like iBeesoft. It is a one-in-all data recovery tool. It has been recently getting upgraded with the support for Windows 11. The iBeesoft Data Recovery is trusted by millions of users and praised by media outlets. No matter whether you want to recover lost data from Internal Drive, HDD/SSD, Memory Cards, RAW Drives or USB Drives it got you covered. Below are the most exciting features of iBeesoft Data Recovery.
- The iBeesoft Data Recovery can be used to recover deleted files, formatted drive recovery, recover partition due to delete or lost, RAW Drive Recovery, Recovery of files after wrong operation.
- It supports most of the popular file types like Documents, Graphics, Photos, Videos, Music, email and other files. So, you have the choice in your hand to select all file types of just particular file types.
- Where other data recovery softwares doesn’t support all the file systems, iBeesoft supports FAT, exFAT, NTFS, NTFS5, ext2, ext3, HFS+ file systems.
- Not just File Types and file systems It is able to recover data from any storage device be it Internal Disk, External Disk, USB, Memory Card, Digital Camera, SSS, etc.
- The iBeesoft supports Windows 11, 10, 8.1, 8, 7, Vista, XP. There is also a Mac version for users running Mac computers.
Now you have a brief idea of the features of iBeesoft. It is the best time to provide steps needed to use it to recover lost data on your Windows 11 PC. The software is famous for its three-step recovery process: select the lost file type, scan PC/device, preview, and recover files. Below is the complete step-by-step process to download iBeesoft on your PC and use it to recover lost data.
Step 1: To recover lost data with iBeesoft you will first need to free download it. Visit this iBeesoft offcial site to go to the official page of iBeesoft Data Recovery. Tap on the free download option to get the installation file. Do note the free version allows free data recovery up to 2GB. If you need more than 2GB of file recovery you will have to purchase the Pro subscription. Once the installation file is downloaded double click on it to install the program.
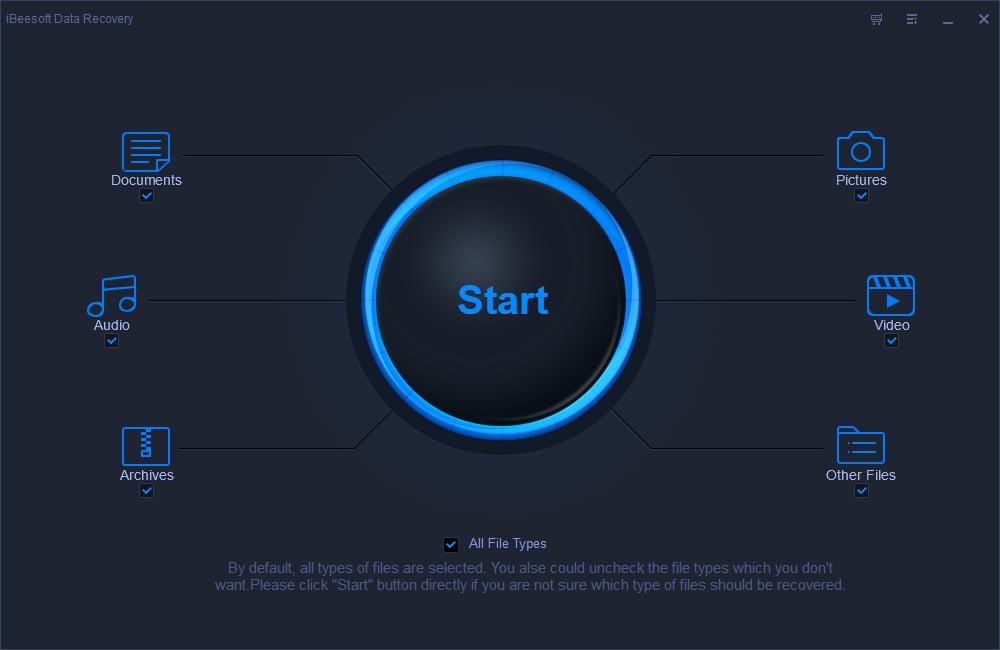
Step 2: After completing the installation process open iBeesoft on your PC. On the very first screen, you will get the option to select file types. If you want to recover all files then check the All File Types box and tap on Start.

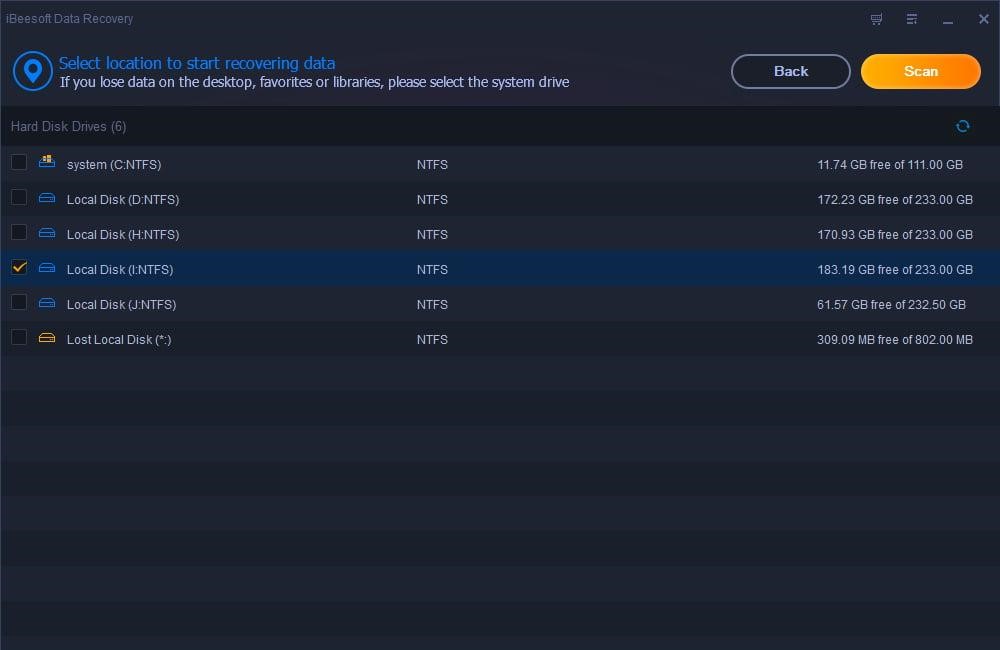
Step 3: After it, you will be asked to select the location in which you want to be scanned. Here select the partition of the drive or any other storage drive you have connected and then tap on the orange colored Scan button.
Step 4: Based on the number of files and amount of storage iBeesoft will take some time to complete the scan. Usually, It takes a few minutes. Once the scan is completed you will get a message of the files that are found. Go through the found files and select the ones you want to recover. After selecting all the files tap on Recover.
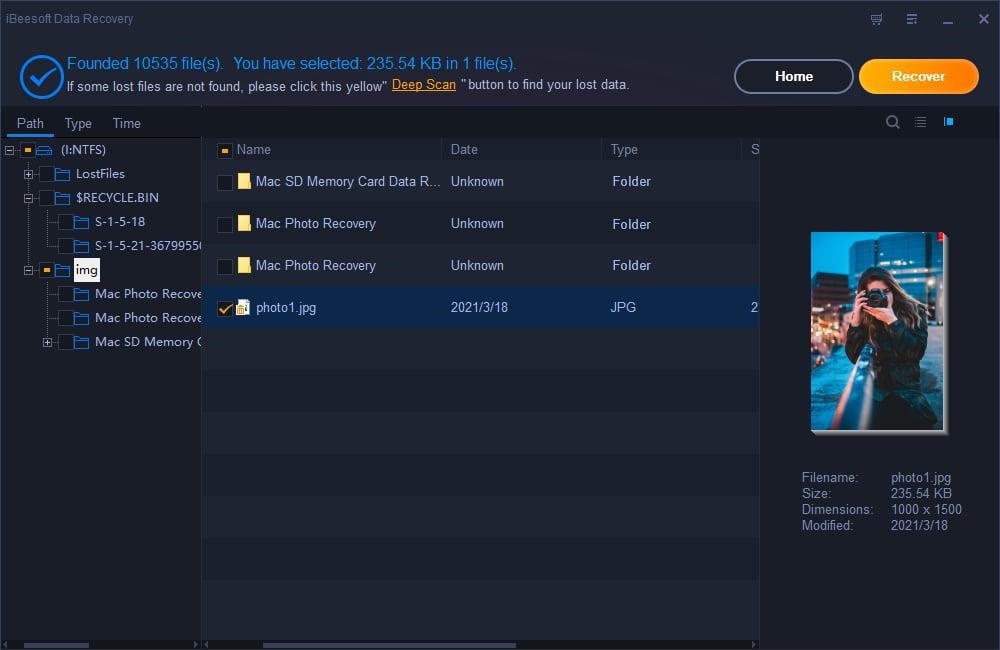
Step 5: Not all files get found with the Quick scan to find the buried file you will have to Deep Scan your storage drive. If you are not seeing a few files at the first attempt, you must try the Deep scan option by tapping on it. You will get all your files once the deep scan is completed.
This is how you can use iBeesoft to recover lost data after Windows 11 update. I know it is easier than you might think. Install iBeesoft, select the file types, scan the drive and recover the lost data. It can’t be easier than this. If you accidentally deleted files, you can also learn 5 ways to recover permanently deleted files from Windows 11 as well.